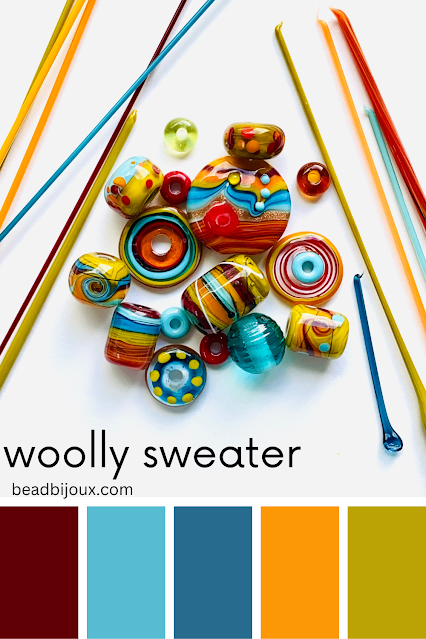
Striking Glass: How to Get Color
Lampworking Tips & Techniques
Any lampworker who has ever attempted to work with 'striking' glass has experienced the struggle.
How do you get all those fabulous color ranges and not just boring tan? Not that tan is a bad color ... but when you spend a small fortune on premium striking glass, tan is not the desired outcome.
If we go way back into the glass time machine, the whole striking glass frenzy started with a furnace glass: Reichenbach R-108 Iris Orange - lovingly nicknamed 'Raku' by the lampworking community ... now I'm sounding like a food blogger 😉

There have been countless forum threads, e-books, tutorials, and conversations around how to get Raku to do its magic. Every single one of them has excellent information that anyone who chooses to work with this glass will benefit by reading and watching.
I am no expert. I still can't get the full color range I want out of this glass after all this time. However, if we break down the already known and published information about this glass, we can at least get a little insight into the basics and start achieving success.
What is Striking Glass?
First and foremost, understanding what is meant by striking is the first clue to getting desired results. In the glass world, it essentially means the glass changes under certain conditions and more specifically, temperatures.
In the fused glass world, this can mean it starts out clear and turns yellow or orange after full fuse temps. That's always a fun surprise when you don't label your glass meticulously and think you are grabbing clear only to end up with orange 😕. This is also true with lampworking colors like pinks, oranges, and yellows. They start out clear in rod form and the color develops as it heats up.
It can also mean changing in opacity once it has been worked in a flame. For instance, glass that starts out transparent but turns opaque after it has been worked is technically a striking glass. What you see is not always what you get.
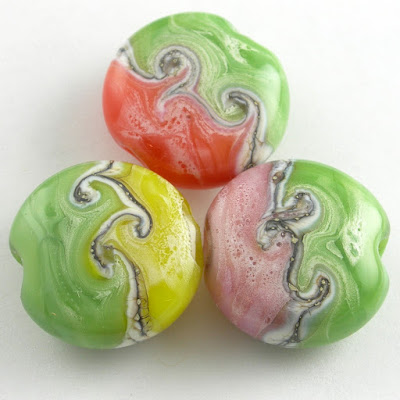
When it comes to solid colors like Raku and other fabulous striking glass on the market, it means the underlying colorants in the glass - such as silver - cause reactions when heated and cooled repeatedly. And those reactions bring out different colors than what you see in the original rod form.
How Do You Strike Glass?
The most simple answer: heat it up and let it cool. That is really all you need for striking simple colors like oranges and yellows ... or changing opacity in opals.
When it comes to challenging colors like Raku and others ... it can be a little more complicated. You have to heat it up enough, let it cool more, and then heat it up again to not quite as hot as the first time.
Make sense? On paper yes. In practice it's not so simple.
How hot is enough? If only we could stick a thermometer probe into the glass as we are melting it to know when we have reached the proper temperature - like when cooking certain foods.
You may have heard the terms 'white hot', 'molten', 'dripping' ... which all essentially mean ridiculously hot until it turns back into its liquid state. That is the key - getting it so hot you can visibly see a change in the glow.
But how? How do you get it that hot without making a giant mess and having it land on your lap? I personally have a hard time keeping everything balanced when it is already on the mandrel, so I am going to share with you the two primary ways I strike glass ... drumroll ... and the main idea is that I strike it before I put it on the mandrel. In other words, I pre-strike my glass.
- Pull it into a stringer: The easiest way to pre-strike your glass is to get a giant blob as hot as you can [before it drops onto your work surface], and then pull it into a stringer. Use the cooled stringer to add glass to your bead as it will already have been struck and will be easier to manage.
- Strike it as you wind it: Hold the rod in the hottest part of the flame until you see it turn almost white and then wind it onto the bead. This allows you to keep the bead at a manageable temperature while allowing you to super-heat the striking glass at the same time.


Comments
Post a Comment